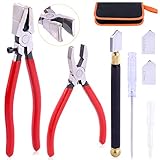
Repairing Copper Foil With
Step By Step Instructions Repairing copper foil can be a daunting task, especially if you’ve never done it before. Just knowing where to start can be confusing. In this tutorial you will learn about the techniques I use. I’ll start off with repairing a split in the foil, which happens as you’re applying the foil. Then I will continue with repairing a broken piece, followed by repairing a damaged item that doesn’t have a broken piece.
Repairing A Split In The Foil
Before I get into broken glass, I want to show you that there are other reasons for repairing copper foil, even before you start to solder the panel. Splits in the foil are the most common reason for pre-soldering repairs. Splits usually occur when you’re crimping the foil around inside curves.
Solder will not bridge gaps, so if you try to cover up the split with solder, it’s not going to work. The split will still be visible. You’re going to have to fix it before you start soldering.
Make sure the area around the split is clean. To be sure, go over the split with alcohol. Take a short piece of foil and wrap it, front to back, over the area where the split is.
Trim it with an exacto knife to make it blend in with the edges of the existing foil. Burnish it very well. That is all you need to do. It is ready to be soldered along with the rest of the seams.
Repairing A Broken Copper Foil Panel
Here is a piece that cracked while I was soldering. A ball of hot solder dripped on it. I was in a hurry and tried to pick up the solder with my hot soldering iron. I will plead temporary insanity, because there is no other reason why I would do such a thing. I know better. It’s something I tell my students not to do. Perhaps it happened for a reason, since I needed something for my “repairing copper foil” tutorial.
When you are repairing copper foil, you first need to get the broken piece(s) out. There are several ways to go about it. I will show you my favorite (and easiest) way first.
You’ll need an aluminum soda or beer can. Cut the top off, then make a cut from top to bottom, and cut off the bottom. I poke a hole near the top, with a knife, so I can get the scissors started.
Now, cut the can length wise, into various width strips. Make most of them around 1/4″ to 1/2″ wide, with a couple smaller and a couple larger. Ordinary scissors cut the aluminum very well, but don’t use your best scissors, as the aluminum will dull them. These aluminum strips are handy for repairing copper foil, so I always have a few of them stored with my foiling tools.
Plug in your soldering iron. While it is heating, flux the solder surrounding the broken glass. If the piece has patina on the solder you can remove the patina, if you want to, with very fine steel wool or Bronzo before you flux.
Bronzo is bronze wool, sold through many stained glass retailers and wholesalers. You can also buy Bronze Wool from some hardware stores such as Ace Hardware. It is wonderful for removing patina, and it takes permanent marking pen and paint pen marks off of glass quickly. It doesn’t leave microscopic fibers like steel wool does.
When your iron is hot, take off as much solder as possible, on both sides of the broken piece. You do this by holding the panel up, on edge, and running the soldering iron along the seams surrounding the broken piece. The solder will run off the panel and land on your work surface. It’s a good idea to do this over newspaper if you want to keep your work surface clean.
Caution…don’t touch those little balls of solder that drop onto your work surface. They are very hot and they can burn like you wouldn’t believe. That is the only down side to repairing copper foil that I can think of.
After the solder is run off, prop up the panel using wedgies, cans, bricks (covered with a towel), anything you can lay the panel on that will elevate it off the work surface. Be sure the broken piece is not directly over one of the props. You want the area, under the broken piece, open, so you can manipulate the aluminum strips.
If the broken glass is an edge piece, hold the soldering iron on the edge to melt any remaining solder. While the solder is hot, slide an aluminum strip between the broken piece and the adjacent piece of glass.
Slowly move the iron around the broken piece, sliding the aluminum strip closely behind the iron. You might want to hold the aluminum strip with needle nose pliers, because it gets pretty hot and becomes uncomfortable to hold with your fingers.
Go slowly making sure no solder fills the gap as you move along. You can usually go right around the glass, and end up where you started. The glass should fall out. If it doesn’t, go around again.
On this particular piece, I could not get the aluminum strip to go between the glass on the side by the nugget. No matter what I tried, the strip would not go in. So, what I did was to heat the solder in the area where I couldn’t get the strip through, and as I heated it, I wiggled the broken piece loose. It came loose fairly easy.
Once the glass is out, run your soldering iron around the edges of the adjoining pieces of glass to get rid of any remaining solder. You want these edges smooth and flat so the new piece of will glass fit in properly. By the way, make sure you clean out the corners, when you are repairing copper foil, so they are sharp corners, not rounded ones from solder built up in them.
If you have a pattern piece already made, slip it in the open spot and see if it fits. If it does fit, you’re in luck. Cut a new piece of glass and place it in the opening to see if it fits. If it doesn’t fit well, do what you have to make it right. Apply the foil and put the piece in place. Now you’re ready to solder.
If you don’t have a pattern piece, slide a piece of paper under the panel and trace around the edges of the adjacent glass, to get a pattern piece. Cut it out and try it for fit. Youmight have to trim a bit off to make it fit well. When you have it right, it’s ready to solder.
Since the rest of the panel has been soldered on both sides, it raises the glass up, off the work surface. To get the new piece of glass at the same level, put a couple of pennies under the new piece of glass before you solder it in place. The pennies will raise the glass to the proper level. I always keep a few pennies in my studio, just for repairing copper foil.
This panel had not been soldered on the back side before I repaired it, so you will not see pennies holding up the glass in this photograph.
For an inside piece (one that’s not on the edge), push the aluminum strip all the way through the solder, so a portion of the strip can be seen on the other side. To do this, hold your soldering iron on the seam, and start pushing the aluminum strip through, right next to the tip of your iron.
Sometimes, if you have trouble pushing the strip through, you will have to hold the iron on one side of the glass and push the strip through from the other side directly below (or above)the iron. It’s a bit awkward, but it can be done. Once you have the strip through the solder, follow the instructions, above, for removing an edge piece.
Using aluminum strips, for repairing copper foil, will work 90% of the time. However, there will be times when you can not get the aluminum strip between the glass. It just won’t go through. In that case, you will have to use my other method to repair copper foil.
Another Technique For Repairing Copper Foil
When you are repairing copper foil that can’t be done using aluninum strips, remove as much solder as possible around the broken piece. Then you will score the broken piece of glass, many times, in all directions (horizontal, vertical and diagonal). Turn the panel over and hold it over something to catch the broken glass as it flies out. A large waste basket or a box will work.
Put on some safety goggles and start tapping the glass from the back side (the side opposite of where you scored). You will have to tap fairly hard to get the glass to break and pieces to start falling out. Be cautious when you are tapping the glass so you don’t hit another piece of glass and break it. You don’t want to repair more than you have to!
When a few pieces have fallen out, you can use needle nose pliers to pull out the rest of the pieces. The foil will remain in place and will need to be removed separately.
After all of the glass is out, heat up your soldering iron. Using your needle nose pliers and the soldering iron, find an end of the foil. Grab the foil with your pliers and pull the foil off as you go ahead of it with your soldering iron. Most times the foil comes off in one piece, but there are times when you get it off little by little.
Once the foil is off, run your soldering iron around the opening to clean up any remaining solder. If you find that any of the foil, around the pieces surrounding the broken piece, has been damaged, that foil will have to be repaired before you proceed. To do this, pull off the damaged bit, but try to leave some foil on either side of it. Clean the area with some adhesive remover like Goo Gone or Oops then wipe it well with alcohol. Put a newpiece of foil over the damaged area and overlap it onto the foil on either side.
Use your pattern piece, if it fits, make a new pattern piece if it doesn’t fit, or place the replacement glass under the opening and draw around the opening with a marking pen. Cut the glass, foil it put it in place and solder it. Remember to put pennies under the glass to raise it up to the correct level.
Solder it in place, and you’re done except to wash, patina and polish.
As you can see, there is more work involved in this technique, of repairing copper foil, and I try to avoid using it whenever possible. The piece I repaired, in the aluminum strip technique, had a nugget that I also had to replace because it had a flaw in it. I could not get the nugget out with the aluminum strip, so I had to use this technique. Since the nugget was very thick, it took some very hard whacking to get it to break. That was not a fun repair, as nuggets are very difficult to score and break.
Repairing a Piece With No broken Glass
When you are repairing copper foil, there doesn’t always have to be a broken piece of glass. This particular piece needed to be repaired because the foil pulled loose as a result of poor placement of the hanging loops. There was no broken glass, but I had to remove the piece that the foil pulled off of and replace the foil.
Pull off the damaged foil, then remove the glass with the aluminum strip technique which is used for repairing copper foil.
Run your soldering iron around the edges of the glass that surround the piece you just removed. You want to get rid any remaining solder, and have it ready for the newly foiled glass that you will be putting back in.
Push foil off the removed piece with your soldering iron. Clean the removed piece with an adhesive remover such as Oops or Goo Gone, then clean again with alcohol. When you are repairing copper foil, it’s important to make sure the glass is squeaky clean before you start to apply the foil. If there is any oily residue left on it, the foil won’t stick to the glass.
Replace the foil, and solder the piece back in place.
Reposition the loops to the ends of the “wings” where they will bear weight better. The ideal positioning of loops is at a solder joint, but on this piece there were no joints to attach them to. The piece is now repaired, but still needs to be washed and polished.
That’s all there is to repairing copper foil. If there is more than one thing that needs to be repaired in a single panel or even a three dimensional piece, you might need to use a combination of the techniques described above. What ever comes your way, you should now be prepared to repair it. |