The Complete Guide to Handmade Stained Glass: 12 Step-by-Step Projects for Lead-Free Glass Art at Home
$24.99 (as of July 9, 2024 11:28 GMT +00:00 - More infoProduct prices and availability are accurate as of the date/time indicated and are subject to change. Any price and availability information displayed on [relevant Amazon Site(s), as applicable] at the time of purchase will apply to the purchase of this product.)
Kicking Glass: A Creative Guide to Stained Glass Craft
41% Off
Stained Glass Making Basics: All the Skills and Tools You Need to Get Started
15% OffThe art of stained glass is one of beauty and craftsmanship, but even the most skilled artisan will encounter the need for repairs. Here’s how to fix your stained glass.
First, assess the damage. Is it a crack or a chip? Is the lead came (the framework that holds the pieces of glass together) bent or broken? Knowing the extent of the damage will help you plan the repair.
Next, gather your tools. A good soldering iron, lead-free solder, flux, a pair of pliers and a glass cutter. You’ll also need a clean, well-lit work space.
If the damage is a crack or chip, use the glass cutter to carefully remove the damaged piece. Sand the edges of the remaining glass to make sure they are smooth. Measure and cut a replacement piece of glass to fit. Use the flux and solder to carefully attach the new piece to the lead came.
If the lead came is bent or broken, use the pliers to carefully straighten or replace it. Make sure the lead came is tight against the glass and the joints are soldered securely.
Finally, inspect your repair. Hold it up to the light to make sure there are no gaps or inconsistencies in the solder. If all is well, your repair is complete.
Remember, each repair is different and the key to a good repair is patience and attention to detail. Don’t rush the process and take your time to make sure every joint is secure and every piece is fitted perfectly.
Stained glass is a thing of beauty, and a well-done repair can make a damaged piece look like new. With care and precision, you too can make your stained glass shine once more.


SPEEDWOX 20PCS Heavy Duty Mosaic Wheeled Glass Nippers with Replacement Cutting Wheel Glass Running Pliers Breaker Grozer Pliers Oil Feed Glass Cutter Set Cut Resistant Gloves Leather Zipper Bag
$45.99 (as of July 9, 2024 11:28 GMT +00:00 - More infoProduct prices and availability are accurate as of the date/time indicated and are subject to change. Any price and availability information displayed on [relevant Amazon Site(s), as applicable] at the time of purchase will apply to the purchase of this product.)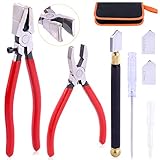


Rustark 3Pcs Premium Glass Running Breaking Pliers and Class Cutter Kit, Heavy Duty Glass Cutting Tool with Rubber Tip, Work Great for Stained Glass, Mosaics, Fusing, Breaking
$22.99 (as of July 9, 2024 11:28 GMT +00:00 - More infoProduct prices and availability are accurate as of the date/time indicated and are subject to change. Any price and availability information displayed on [relevant Amazon Site(s), as applicable] at the time of purchase will apply to the purchase of this product.)


Swpeet 3Pcs Heavy Duty Glass Running Pliers, Breaker Grozer Pliers and Grip Oil Feed Glass Cutter Kit, Professional Stained Glass Cutting Tool with Extra Rubber Tips Perfect for Stained Glass Work
$25.68 (as of July 9, 2024 11:28 GMT +00:00 - More infoProduct prices and availability are accurate as of the date/time indicated and are subject to change. Any price and availability information displayed on [relevant Amazon Site(s), as applicable] at the time of purchase will apply to the purchase of this product.)


Rizom Glass Cutting Tool, Glass Cutter 2-20MM, 8" Tile Nippers, 8" Glass Running Pliers with Curved Jaws, 6" Breaker Grozer Pliers, Glass Cutter Kit for Stained Glass, Tiles, Mosaic Cutting
$35.99 (as of July 9, 2024 11:28 GMT +00:00 - More infoProduct prices and availability are accurate as of the date/time indicated and are subject to change. Any price and availability information displayed on [relevant Amazon Site(s), as applicable] at the time of purchase will apply to the purchase of this product.)